
The History of the Blue Angels - A reasonable Modeler's Guide (Updated!)
- Dec 28, 2021
- 13 min read
Updated: Jan 24, 2025

This is not a regular modeler’s guide; it's a reasonable modeler’s guide, which means that if you are planning to build the History of the Blue Angels, this will help you to accomplish the task in a reasonable way with an acceptable level of historical accuracy, and hopefully, without going insane in the process.
First, a little bit about the project
I built this history of the Blue Angels collection for the United States National Naval Aviation Museum, which received the models in donation and owns them today. My original idea included not only the exhibition aircraft but also the side shows, auxiliary, and logistic support (beetle bombs, Cutlass, two-seaters, and transports). The museum only wanted the exhibition ones, so I limited the project to just those, although I still want to build all the others. Maybe one day.
It took me almost two years and about 1,000 hours of work to make these, and that was mainly because when I was practically halfway through the project, I decided to re-start it. Yes, you read that right. I experienced issues with the paint and clear coat, which led me to ruin several kits from the Hellcat to the Panther. I honestly dealt with repeated frustration before achieving results I considered acceptable for a Museum. See the importance of being reasonable?
I also added an additional aircraft that is always forgotten in the timeline representations, the Short Nose Tiger. This one is actually expendable to the purpose of depicting the evolution of the Blues since you can just include only the long nose one, but I wanted to add it for three reasons: 1 – It was actually the first Tiger variant they flew, 2 – Although it looks almost exactly like the regular Tiger, it has some noticeable differences that, to me at least, make it display worthy, and 3 - It’s a rare and interesting subject.
Besides the models, the collection has another unique characteristic: the Blue Angels insignia on the display bases. As you probably know, the Blue Angels insignia changed as the aircraft were changing. In the first years, they had Hellcat/Bearcat-ish silhouettes coming from behind the cloud, while from the Panther moving forward, they adopted the style we know today. Since there was no way I could get patches for each era, I ordered custom stickers, so I designed the stickers for each type of aircraft and had them printed.
Planning ahead
The Blue Angels are a very controversial modeling subject, mostly because there is a lot of discussion around the colors. There are also details to observe when building their aircraft that cannot only influence which kit to use but also what modifications make sense to make (or avoid).
Completing this project with an acceptable level of accuracy requires extensive research and advance planning. There is a lot of information on the internet and, of course, an incredible amount of opinions and discussions. You can find an excellent article about the Blues colors here: Blue Angel Blue and Gold
In my quest to be as precise as I could, I complemented my research with a considerable number of books, both depicting the history of the Blue Angles and the development and details of each specific aircraft and even then, I wasn’t sure about what was the truth “Blue Angels wise”, since no one seems to have it. So, at the end of the day, and with the purpose of avoiding going insane, I had to draw a line in the sand and conventionalize some aspects.
The first thing was what aircraft versions I was going to make since some of them varied in between seasons. As usual, the scale wasn’t an issue since all these were going to be 1/72, not only because it’s my scale of choice but because it’s the scale that has the best kit availability.
The second thing was the colors and markings, with one main consideration in mind: Blue tone variations were pretty evident between some aircraft, but yellow variations were not. This allowed me to plan for the blue paint and rule the yellow issue out by using the same tone for every aircraft. Markings-wise it was an easy call; all aircraft were going to be the CO bird: #1
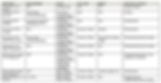
The third and final thing was which mods and details I was going to care about for each plane. This required looking at a TON of photos and determining specific aspects that made them unique. Most of the time, this included external mods, wheels, and some cockpit details like installing the proper ejection seat, etc.
With all this in mind, I made a grid of requirements for each machine and tried to stick to it as best as possible. The final results, though looked like this:
Now that we have this figured out, let’s move to the actual models. Since this intends to be just a guide, I won’t go into a lot of detail about them. I may make individual posts in the future, but in any case, you can see more photos of them on my Facebook Page: https://www.facebook.com/WingsofGoldScaleModels
The Models
Grumman F6F-5 Hellcat

The Blues operated the Hellcat during 1946, and it was only the F6F-5 variant.

I used the Eduard F-6F5 Profipack kit, which is an awesome kit and comes with some nice add-ons and options.
I built the kit pretty much out of the box, although I used a Quickboost engine because I liked its level of detail more than the one that comes with the kit. In some photos, I observed that the Blues’ Hellcats had diamond tread tires, so I used those from the kit, which comes with two tire thread options.
I painted the model Insignia Blue using Mr. Paint MRP 300, and since the records show the markings were golden and not yellow, I used the set from Draw Decal.


Grumman F8F-1 Bearcat

The Blues flew the Bearcat between 1946 and 1949, and through that period, they painted them in two schemes: The early one was plain blue with yellow markings, and the late one was painted in an apparently darker blue (more like the Panthers perhaps? Who knows…) with bare metal details in the leading edges.
One important aspect to consider for the Bearcat is that the Blues used the 1 variant and that there is only one kit in 1/72 that depicts it, which is the Sword kit. The other kits in the market (Monogram, Revell, and Art Model) are actually F8F-2.
The most noticeable difference between the 1 and the 2 is that the 1 has a 12-inch shorter tail fin. Other differences include the 1 having 5 exhaust stacks and the 2 only 3 but larger, and the 2 having bulged machine gun access panels on the wings. You can also see in several photos that the Blues used the early 1 variant without the rollover pylon behind the pilot’s headrest for the main act aircraft. The Beetlebomb, on the other hand, seemed to be a late variant.

Anyway, the thing is that if you want to do a 1 you’ll need the Sword kit, or you’ll need to modify the Monogram/Revell kit, or the Art Model one, to look like it.
For my model, I used the Sword Kit. The kit is not widely available, but some usually appear from time to time on EBay and other places. The kit is a classic old Sword, so not great at all. It has no cockpit detail whatsoever, no good fitting, and thick, soft plastic, but it comes with a nice resin engine and, overall, once you put it together, makes a decent F8F-1 representation.
I had to scratch the cockpit and also used the landing gear from a monogram kit, which, believe it or not, looks better than the one from Sword. For the wheels, I used a P-40 resin set from Aires (straight thread), which looks basically the same as the Bearcat ones, although I had to add the brake detail.
I painted the model with an Insignia Blue/Insignia White mix. It was my first mix, so it was somehow challenging until I reached a tone that I liked. In the end, I used 1-part Mr. Paint Insignia Blue (MRP 300) and 9 parts Insignia White (MRP 135). Yes, it took me a lot to downgrade the blue. Decals were again Draw Decals, which were awesome as always.


Grumman F9F-5 Panther

The Blues operated two variants of the Panther between 1949 and 1955. Initially, they flew the F9F-2, but they stopped the shows while serving in Korea, and when they returned, they moved to the newer F9F-5 version.

While there are differences between the 2 and the 5 versions, externally, they look the same. From a Blue Angels standpoint, the main differences between these variants were the metallic details in the leading edges and wing roots. I decided to go with the 5 because I simply liked it more.
I used the Hobby Boss F9F-3 kit. This is a lovely kit with crisp detail and easy to build. It’s also a lot better than the one Hasegawa offers.
I built it mostly straight from the box with some Eduard PE interior and resin wheels from Aires. While the seat that comes with the kit has more or less the correct shape, I had to add some improvements to it. One detail I observed in photos from the Blues is that they had the rope ejection handles in the headrest, so I decided to add them using EZ-line. If you are interested, you can see some good comparisons about Grumman seats here: Grumman F9F/F-9 Panther and Cougar Ejection Seats
I was still experimenting with the color mix here. I used again the mix of MRP Insignia White and Insignia Blue, but this time was around 1/4 of a Tamiya 6 ml jar in white, and the remaining in blue. The metallic color was achieved with AK Extreme Metal Polished Aluminum. Decals are a combination from Draw Decals' Bearcat and Cutlass sets.


Grumman F9F-8 Cougar

The Cougar operated with the Blues between 1955 and 1957, and they used an early version of it. The main aspects you can observe in their aircraft are the absence of cannons in the nose and the lack of intake deflectors, which were typical in later versions.

I used the only Cougar kit available in 1/72 that can serve this purpose, the Hasegawa one. It’s an old kit, but it fits nicely and looks fine once assembled. It lacks cockpit detail, so it required some work to look decent there. For that, I used some Photo Etched from Resin Art, although the Eduard Panther set may do the trick, too. I also used a Hobby Boss Panther seat, but this time, I installed rigid ejection handles.
Exterior-wise, the kit comes with intake deflectors, but the Blues’ birds didn’t have them, so I removed them, and when I installed the intake edges, I just filled the gaps. Finally, I used some nice Aires Panther resin wheels.
The model is painted with the usual mix of MRP Insignia White and Insignia Blue, this time 1-part White and 5 parts Blue. The yellow is Mr. Paint Dark Chrome Yellow (MRP 028). The metallic details are again AK Extreme Metal Polished Aluminum, while the decals are another combination of Draw Decals' Bearcat and Cutlass sets.


Grumman F11F-1 Tiger (Short Nose)

The Blues used the Short Nose Tiger for only 2 seasons in 1957/58, to then transition to the most popular Long Nose one. The main difference, besides the nose, between these variants was that the short nose had straight wing leading edges.
Another interesting aspect of the Blues’ short-nosed Tiger was that they painted it with block letter markings for the second season. This was the version that I initially intended to make, but the decals got destroyed, and upon the impossibility of getting another set, I went with the early paint scheme, which is the one that the aircraft had when they were initially delivered to the Team. You can see the difference in the images below: early markings on the left and late markings with block letters on the right.


I used a special edition Hasegawa kit that comes with a resin short nose. It’s a very hard-to-get kit, and to be completely honest, any avid modeler would be able to make the nose from scratch, probably with epoxy putty or wood. Overall, it’s the long nose kit to which you just have to cut the leading edges close to the wing roots to make them straight and cut the nose to put the short one.
This kit is an old kit, and to be fair, it’s not bad at all, it fits nicely and looks good, although it has raised detail. It also lacks cockpit detail and will require some detail work in the main gear wheel wells since they are pretty visible.
For the cockpit interior, I used an Airwaves PE set, while the seat is an updated Hobby Boss Panther seat. There is some scratch work inside the main gear wheel wells, while the wheels themselves are early A-4 resin wheels from Aires, which look exactly like the ones these Cats had in real life. The smoke system pipe that runs externally on the left side it’s just a Plastruct 0.10”/0.3 mm rod.
The model is painted with the usual MRP Insignia White and Blue mix, this time 1-part White and 4 parts Blue. The yellow is Mr. Paint Dark Chrome Yellow (MRP 028). The metallic details have two tones. The leading edges and exhaust are AK Extreme Metal Polished Aluminum, while the intake edges are AK Extreme Metal Chrome. Decals are a combination of kit decals and some bits from the CAM Decals Hornet set (the Blue Angels legend).


Grumman F11F-1 Tiger (Long Nose)

The Long Nose Tiger entered in service with the Blues in 1958 and remained until 1969. It's basically the same airplane as the a short nose one, but with some improvements.

I used the regular Long Nose Hasegawa kit, with the same detailing I applied to the short nose one (cockpit and wheel wells detailing, the addition of the smoke system), although this time, the wheels are Aires late A-4 wheels, which matched the real aircraft.
I also used the same colors I used in the short nose, while the decals were the kit decals, so no innovation for this one really.


McDonnel Douglas F-4J Phantom II

The Mighty Phantom was the Blues’ bird between 1969 and 1974. They operated the J version, so there are no sub-variants for this one.

I used the latest Academy kit, which is lovely. Highly detailed and easy to build. The only downside is that it doesn’t come with an open cockpit option, so I had to use a Hasegawa canopy, which fits fine. I complimented the kit with Eduard PE interior, Aires MK H7 seats that I detailed with some scratching, and Eduard resin wheels. I made a mistake with this one and didn't use short exhaust nozzles, so I might try to replace them next time I'm in the Museum. Don't be like me, and use some short exhaust nozzles if you are going to build this one!
I initially painted the model with a mix of 1-part Mr. Paint Dark Blue SU 27 (MRP 045) and 4 parts MRP 300 (insignia Blue), but I didn’t like it, so following the advice of my friend Javier from Aviones a Escala, I filtered it with Mr. Color 328 (Blue Angels Blue – FS15050) until I achieved a decent tone. I think that if you paint it just with the 328 it will look fine to be honest. The yellow is Mr. Paint Dark Chrome Yellow (MRP 028). Metallic parts are AK Extreme Metal Polished Aluminum for the wings' leading edges and Extreme Metal Chrome for the intake edges. The hot area metallic tones are a mix of AK Extreme Metal Titanium, Steel, and Stainless Steel. The decals are from the CAM Decals Blue Angels Phantom set.


McDonnell Douglas A-4F Skyhawk

The Blues operated the Scooter between 1974 and 1986, it was the longest serving aircraft before the Hornet. Their version had bigger, seamless intakes, like the Super F, and some other features to consider: In the place of the left side cannon, they installed a pod that was used to transport the portable access ladder. Also, the slats were non-operational and, therefore, soldered to the wing, so if you are planning to build the model with the slats down, you may want to revise that.

I used an A-4E/F kit from Fujimi, which we all know is a great kit. After decades, Fujimi’s 1/72 Skyhawks continue to be the best. Unfortunately, the E/F’s are not easy to find, but sometimes they pop up, especially the Blue Angels version, although its only differences are the decals and that is molded in blue (no ladder pod or bigger intakes).
To solve the intake issue, I used the intakes of an Italeri OA-4M. They fit pretty well on the Fujimi kit; they are seamless and look more like the Super F ones. I also complemented the model with an Aires resin interior, Aires resin wheels, and a Quickboost resin exhaust nozzle. The ladder pod it’s just a piece of Plastruct rod.
I painted the model with Mr. Color Blue Angels Blue – FS15050 (328) and Mr. Paint Dark Chrome Yellow (MRP 028). I’m aware that the actual Blue Angels Blue is a commercial paint and not an FS Standard one, but the 328, although not perfect, looks pretty OK to me. Metallic surfaces are all AK Extreme Metal Chrome, and decals are from the CAM Decals Blue Angels A-4 set.
The final glossy finish was achieved with a process that involved an initial 12,000 grit Micro Mesh pass, and a final Tamiya Polishing Compound buff (just the finishing grit which is kinda waxy).


McDonnell Douglas – Boeing F/A-18 Hornet

The Blues have been flying the Legacy Hornet since 1986, both the A and C versions of the single-seaters through time. They transitioned to the Super Hornet in 2021.

I chose the Academy F/A-18A kit Blue Angels edition. The kit is great with very nice details, although the entire nose assembly is not the best. It comes with Cartograph decals, which look really awesome, although they are a bit thick. The kit also includes different tails that give you the option to build an A or a C version but keep in mind the wheels are incorrect.
I complimented this model with some Eduard PE for the interior and access ladder, an Aires resin seat, Res-Kit resin wheels, and WolfPack Design flap-down wings and exhaust nozzles.
For the colors, I followed the same criteria as with the A-4 (Mr. Color Blue Angels Blue – FS15050 – 328 and Mr. Paint Dark Chrome Yellow – MRP 028). I also applied the same method for the glossy finish. Decals are a mix of the kit and CAM Blue Angels Hornet set.


Boeing - F/A-18E Super Hornet

Coincident with the celebration of their 75th. Anniversary, the Blues transitioned to the Super Hornet in 2021.

I once again chose an Academy kit. The kit is great, and although it's basically a snap model, it's even better than their A/C/D version both from a design and detail standpoint. Perhaps its only issue is that the canopy doesn't come open, so if you want to open it you'll have to cut it.
As I did with the Legacy Hornet, I complemented this model with some Eduard PE for the interior and access ladder, and an Aires resin seat. The flaps this time were from Air-Graphics Models, while the wheels are a mix of the kit's rim with the Res-Kit tires (the actual Academy kit rims are more accurate than the Res-Kit ones).
For the colors, I went as usual for the later models: Mr. Color Blue Angels Blue – FS15050 – 328 and Mr. Paint Dark Chrome Yellow – MRP 028. Decals are from Mil-Spec Decals (which I think are formerly CAM). Really good set depicting the markings for the 2021 season. I believe, though, that their yellow changed and doesn't match exactly the Chrome one (perhaps the Mr. Color Blue Angel Yellow is a better match), but they are, as usual, awesome.


A final comment…
Well, if you’re planning to get into the challenge of building the history of the Blue Angels, I truly hope you find this useful.
For me, this has been a multi-year project involving more than 1000 hours of work, and even when sometimes my mistakes deprived me of having fun, it has been extremely rewarding and, perhaps, my biggest achievement since I started this hobby.


If you have any questions or opinions, drop me a line below. As always, thanks much for reading, and happy modeling!
Max,